Intro To Anaconda
 |
| Image source : https://www.anaconda.com/ |
OK.
First Off,
Intro (What Anaconda? Why Anaconda? How Anaconda?)
Paraphrasing from Wikipedia (https://en.wikipedia.org/wiki/Anaconda_(Python_distribution)):
Anaconda is a free and open-source distribution of Python that serves as the perfect platform for scientific computing, Data Analysis, Machine Learning (our main interest)
Anaconda makes is really simple to apply machine learning projects, and is really great at managing packages.
To install Anaconda
Go to
Scroll waaaayyyy down, until you see something like this :

Download the appropriate package (according to your computer OS and architecture).
Also, Make sure you're downloading for Python 3.7
During the installation, don't forget to check the following options when prompted:


After you're done with the installation, there's another small thing I want you to introduce...
Environments
And here we come to the main reason we're installing Anaconda.
Anaconda helps us set up multiple virtual environments.
Why do we need to know and work with virtual environments?
It's because when we're working with multiple projects, it sometimes happens that a lot of these projects use different packages or different versions of the same packages. So, maybe, suppose if you have a project that uses a certain version of some package and another project that happens to use a different version of the same package, you'll have a tough time implementing both the projects because you can't have two versions of the same package running simultaneously.
Therefore, what these virtual environments helps us achieve is that we can now create different environments that are completely independent of each other. This way, we can work with one project with some package in one environment and a different project with different packages in a different environment never having to worry that they might ever interfere with each other.
Setting up virtual Environment is easy:
Just open Anaconda Navigator and click on Environments

Click on Create, name the environment whatever you want, hit Create!
(I'm making an environment called "Web Automation", that I'll use in the future as well )

And that's it!
The new environment is set up!
Let us download a package and see how environments work, what difference do they make and how to run Jupyter Notebook (a very handy tool for learners and experts alike)
To download the package, make sure you have the right environment selected (it will have a play button beside the selected environment)
Let's download a package called Selenium now.
Search for "Selenium" in the search box in the top right (you might have to minimize the Anaconda Navigator and the side menu showing all the environment names). Also, from the drop down menu make sure you've selected All


Select selenium to install

Then select Apply.
That's it.
That's almost the same steps with installing any other package.
After a package has been installed, it'll show a tick mark beside it

Now to see how environments work, we'll open Jupyter notebook in different environments and run the same code (just importing the package).
Go to Home and choose the base (root) environment

Launch Notebook (see in pic)
It'll open in your default web browser
Navigate to whatever folder you want to create a new file in.
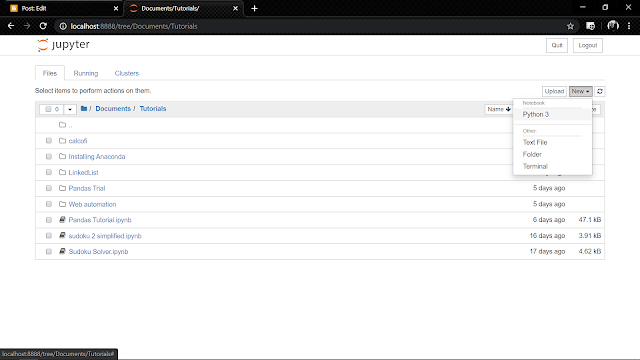
Then, click on the "New" button on the top right and select Python 3.

Click on "Untitled" and type in whatever name you want and then press Rename.
I named it Test.

And hit Ctrl+Enter.
You'll probably see an error such as this:

This happened because we hadn't installed the selenium package in the base (root) environment.
But let's close all these windows, and do all this again, but in the Web Automation environment
Go back to the Anaconda Navigator window and choose Web Automation from the drop-down menu

Notice, how it now says install, in place of Launch?
That's because Jupyter Notebook hasn't been installed in this new environment.
Anyways, install and then launch Jupyter Notebook (might take a couple of mins to install)
All the steps are same from before (It'll launch browser. Navigate again to that folder, open the already created file, type in the same command, press Ctrl+Enter)

That's because we HAD installed that package in the Web Automation environment.
This proves how each environment works independent of each other.
Typically, we use a different environment for different projects
We're going to use environments and Jupyter Notebook, a LOT, in our further articles.
Hope you followed along.
Until Next Time.
Cheers!
Satwik
Previous Post :
Next Post : Intro to Pandas


Comments
Post a Comment